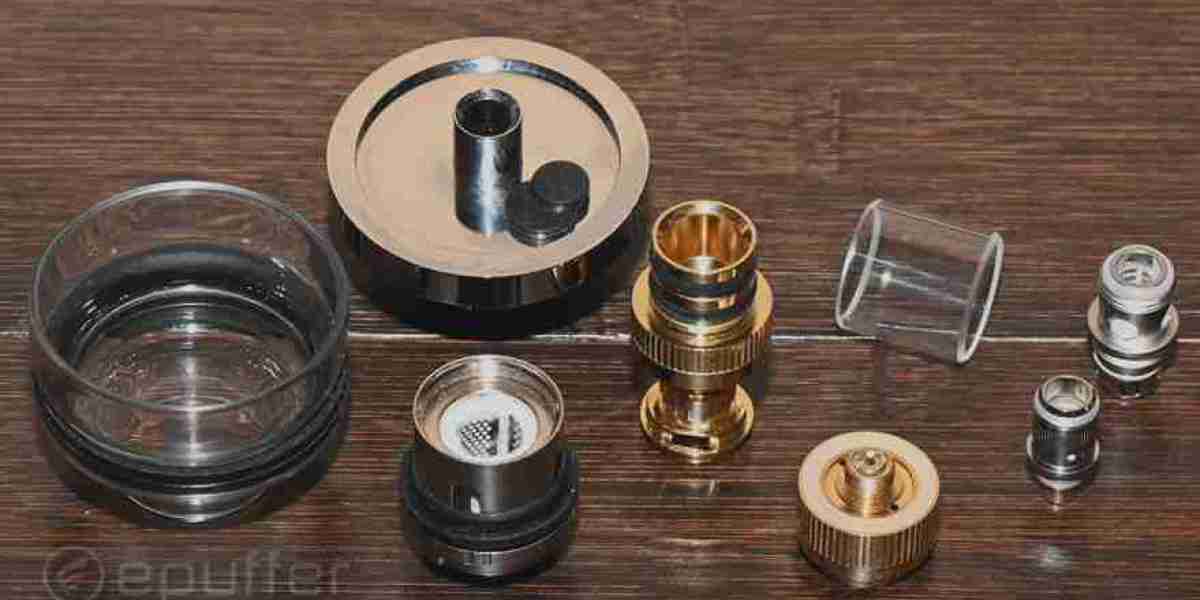
One of the critical components that contribute to a satisfying vaping experience is the vape atomizer. This article aims to provide an in-depth understanding of vape tanks, the various types of atomizers, maintenance tips, and answers to frequently asked questions.
What Are the Different Types of Vape Atomizers?
The evolution of the vape atomizer is a fascinating journey that reflects the broader advancements in vaping technology. Initially, early vaping devices were equipped with simple atomizers that relied on basic heating elements. As the demand for better performance grew, vape manufacturers introduced more sophisticated designs. Today, vapers can choose from a variety of atomizers, each offering unique features and benefits.
Key Features of Each Type
RDA (Rebuildable Dripping Atomizer): This type of atomizer allows users to build their coils and wicks. RDAs are favored for their exceptional flavor production and the ability to customize the vaping experience.
RTA (Rebuildable Tank Atomizer): RTAs combine the features of an RDA with a tank system, allowing for easier refilling while retaining the customization of coil building.
Sub-ohm tank: These tanks utilize coils with resistance below 1 ohm, resulting in massive vapor production and intense flavor. They are perfect for those who prefer cloud chasing and strong throat hits.
Vape cartridge: Often used with portable vape pens, cartridges are pre-filled containers that simplify the vaping process. They usually contain oil or other liquids and are available in various flavors and strengths.
How to Choose the Right Atomizer for You
Selecting the appropriate atomizer involves understanding your vaping preferences, whether you prioritize flavor, vapor production, or convenience. Beginners may prefer sub-ohm tanks or vape cartridges for their ease of use, while advanced users might opt for RDA or RTA systems for customization.
How Can You Effectively Clean Your Vape Atomizer?
Why Is Regular Cleaning Important?
Over time, residue from e-liquids can build up, leading to burnt tastes, reduced vapor production, and potential health concerns. Proper maintenance ensures that your atomizer remains in top condition and prolongs its lifespan.
Step-by-Step Cleaning Process
Disassemble Your Atomizer: Carefully remove the atomizer from your device and disassemble it into its individual components. This typically includes the tank, coil, and mouthpiece.
Rinse with Warm Water: Rinse each part under warm water to remove e-liquid residue. Be cautious not to submerge electronic components.
Use Isopropyl Alcohol: For deeper cleaning, soak the components in isopropyl alcohol for a few minutes. This will help dissolve any stubborn residue.
Dry Thoroughly: Allow all parts to dry completely before reassembling your atomizer. This step is crucial to prevent any moisture from affecting the coil and wick performance.
Recommended Cleaning Solutions and Tools
Use gentle cleaning solutions designed specifically for vape tanks and atomizers. A soft brush can help scrub away residue without damaging the components. Avoid harsh chemicals, as they can leave harmful residues.
What Are the Best Practices for Disassembling Your Vape Atomizer?
How to Disassemble Your Atomizer Safely
To avoid damaging your device, follow these steps:
Turn Off Your Device: Always turn off your vape device before disassembly to prevent accidental firing.
Carefully Unscrew the Components: Gently unscrew the tank from the battery and separate the various components without using excessive force.
Keep Track of All Parts: Lay out all parts systematically to ensure you can reassemble them easily.
What to Inspect During Disassembly?
During disassembly, check the condition of the atomizer core in vape and other components. Look for signs of wear, burnt coils, or damaged seals, and replace any worn-out parts to maintain optimal performance.
How Often Should You Replace the Coil in Your Vape Atomizer?
Signs That Indicate Coil Replacement
Burnt Taste: If you notice a burnt or unpleasant taste, it’s likely time to replace the coil.
Reduced Vapor Production: A significant drop in vapor production can indicate that the coil is worn out.
Gurgling Sounds: If your device makes gurgling noises, it may signal that the coil is flooded or needs replacing.
Different Types of Coils and Their Lifespan
Different types of vaporizer coils have varying lifespans, depending on usage and wattage settings. Generally, coils can last anywhere from a few days to a couple of weeks. Sub-ohm coils, for example, may require more frequent replacement due to higher wattage use.
How to Replace the Coil Properly
Disassemble the Atomizer: Begin by disassembling the atomizer to access the coil.
Remove the Old Coil: Gently unscrew or pull out the old coil from its socket.
Install the New Coil: Insert the new coil into the atomizer, ensuring it’s seated properly.
Prime the Coil: Before using your device, add a few drops of e-liquid directly onto the coil to prevent dry hits.
Reassemble the Atomizer: Put all components back together and fill the tank with e-liquid.
Allow the Coil to Saturate: Wait a few minutes before vaping to ensure the new coil is adequately saturated.
By understanding the different types of atomizers, performing regular cleaning, disassembling with care, and knowing when to replace your vaporizer coil, you can enjoy rich flavors and consistent vapor production.


